‘Thömchen’ cake

Thomchen-11

This is one of my favorite cakes ever. My mom has an old friend from some time she spend in Germany, and her nick name is Thomchen. This delicious hazelnut-chocolate loaf recipe come from her, so I have always known it as Thomchen-cake.

The cake is typically German in its use of hazelnut meal, which makes it wonderful rich and not overly sweet. You can use toasted or raw hazelnuts with equal success, the taste will be a little different, but I can’t say which is better.

Ingredients:

  • 100 g hazelnut meal (or hazelnuts) (3.5 oz)
  • 125 g butter (4.4 oz)
  • 200 g sugar (7 oz)
  • 3 eggs
  • 125 ml milk (0.5 cup)
  • 150 g flour (5.3 oz)
  • 2 tsp baking powder
  • 100g chopped hazelnuts (3.5 oz)
  • 100g chopped dark chocolate (3.5 oz)

Method:

1. Grind the hazelnuts to meal, if needed. You can use a regular food processor for this.

Thomchen-1

Thomchen-2

2. Chop the chocolate and the remaining hazelnuts coarsely.

Thomchen-3

3. Grease 2 loaf tins and line with parchment paper. Preheat oven to 175 C/ 350 F.

4. Mix the butter and sugar together with an electric mixer, until light and fluffy.

Thomchen-4

5. Add the eggs one at a time.

Thomchen-5

6. Mix in the milk.

Thomchen-6

7. Add the flour, hazelnut meal and baking powder and mix well.

Thomchen-7

8. Add the chopped nuts and chocolate.

Thomchen-8

9. Scrape the dough into the prepared tins and spread it out.

Thomchen-9

10. Bake for about 60-70 minutes or until a toothpick inserted comes out clean. You may have to cover the loafs with foil by the end if they get too dark.

11. Let cool for 5-10 min in the tin on a rack, then take out of the tins and place on a rack to cool completely.

Thomchen-10

Rich, delicious without being super sweet – it is easy to eat more than one piece! I think this is a little different than many load style breads and cakes you get in the US.

Chocolate Marzipan Loaf

marzipan loaf-10

Many years ago, my husband gave me The Ultimate Encyclopedia of Chocolate, and this loaf cake is one of the great recipes in the book. It is not too sweet and the marzipan gives it at wonderful flavor.

Ingredients: (original recipe in The Ultimate Encyclopedia of Chocolate)

  • 115 g unsalted butter, softened (1 stick)
  • 150 g light brown sugar (5.3 oz)
  • 2 eggs
  • 3 tbsp unsweetened cocoa powder
  • 150 g all-purpose flour (5.3 oz)
  • 2 tsp baking powder
  • 1/2 tsp salt
  • 130 g marzipan / almond paste (4.6 oz)
  • 100 ml chocolate chips ( 1/2 cup)

Method:

1. Grease a loaf tin and line bottom with parchment paper.

2. Preheat oven to 350 F/ 180 C.

3. Cut marzipan into small (1/2 inch / 1.5 cm ) cubes. 

marzipan loaf-1

4. Beat butter and sugar with a mixer until creamy.

marzipan loaf-2

5.Add the eggs one at a time, mixing well after each.

marzipan loaf-3

6. Add the flour, salt, baking powder and cocoa and mix.

marzipan loaf-4

7. Fold in most of the chocolate chips and marzipan pieces, reserve about 2 tbsp of each.

marzipan loaf-5

8. Scrape the batter into the loaf tin and smooth out.

marzipan loaf-6

9. Sprinkle the reserved chocolate chips and marzipan pieces on top.

marzipan loaf-7

10. Bake for about 45-50 minutes. The cake should be firm and the marzipan on top browned.

marzipan loaf-8

11. Let cool in the tin for about 5 min, and them gently remove and continue cooling on a wire rack.

marzipan loaf-9

Easy and yummy and a bit different. I recommend using a serrated knife or bread knife to cut it, as it is a bit crumbly.

Chocolate Cupcakes

cupcakes-20

I know a lot of people love cupcakes, but I have other cakes that I enjoy more. However, sometimes, you just need a cupcake. Rich frosting, fun decorations and of course, if you’re me, lots of chocolate.

I found this recipe on JoyofBaking.com. I found lots of different cake recipes by doing a quick search, but not too many frosting, and to me the frosting is what sets a cupcake apart, and a bad frosting means a cupcake is just a cake with a heap of unappealing sugar on top. This recipe had a frosting included and it looked promising, and it was. The use of unsweetened chocolate really made very chocolaty rich without being too sweet.

I also went a got a small cake decorating set cake decorating set from Wilson, and I was glad I did. It made it really easy to decorate and make them look good, and I have been missing having some nice way to use ganache and similar for other cakes so they look prettier.

Ingredients, cake: (original recipe on JoyofBaking.com)

  • 50 g unsweetened cocoa powder (1/2 cup)
  • 240 ml boiling water (1 cup)
  • 175 g all purpose flour (1 1/3 cup)
  • 2 tsp baking powder
  • 1/4 tsp salt
  • 113 g unsalted butter, softened (1/2 cup / 1 stick)
  • 200 g sugar (1/2 cup)
  • 2 eggs
  • 2 tsp vanilla extract

Ingredients, frosting:

  • 120 g unsweetened (100% cocoa) chocolate (4 oz)
  • 150 g unsalted butter, softened (2/3 cup)
  • 160 powdered sugar (1 1/3 cup)
  • 1 1/2 tsp vanilla extract
  • Method:

1. Preheat the oven to 375° F/ 190° C and line a 12 muffin tin with cupcake liners.

2. Pour the boiling water over the cocoa powder and stir until smooth.

cupcakes-1

3. Mix the flour, baking powder and salt.

4. Use an electric mixer to mix the butter and sugar until fluffy.

cupcakes-2

cupcakes-3

5. Add the eggs one by one, mixing after each one.

cupcakes-4

6. Add the vanilla extract

7. Mix in the flour, baking powder and salt mixture, taking care not to over mix. You can switch to hand mixing at this point.

cupcakes-5

cupcakes-6

8. Add the cocoa mixture and stir until you have a smooth batter.

cupcakes-7

9. Pour the batter into your prepared cups.

cupcakes-8

10. Bake for about 16-20 minutes, until firm and springy on top, and a toothpick comes out clean when inserted.

cupcakes-15

11. Cool on a wire rack. Do not frost until they are completely cool.

cupcakes-16

12. To make the frosting, start by  chop and melt the chocolate. You can do this in a double boiler, or like I do in the microwave. If you use that method make sure to do short intervals and stir the chocolate as you go along.

13. Beat the butter until smooth with and electric mixer.

cupcakes-10

14. Add the sugar and mix until very fluffy. Then beat in the vanilla extract.

cupcakes-11

cupcakes-12

15. Mix in the melted chocolate on low speed.

cupcakes-13

cupcakes-14

16. Now you can either use a knife or spoon to spread the frosting on the cupcakes, or use a piping set. If you are, choose a tip and fill a piping bag. I used Wilson 1M star tip.

cupcakes-17

17. You can either decorate by making a top down ‘star’ or by swirling a round pattern, I prefer the latter. It was very easy to swirl it around the cake.

cupcakes-18

18. Top with sprinkles, if desired. Sprinkles are fun!

cupcakes-19

It was very easy to decorate the cakes with the piping tip, I was please with how they looked. The frosting was really great, even my husband who usually find cupcakes too sweet liked it. I think the cake itself could be more interesting, but I also did not use Dutch processed cocoa as the original recipe called for, maybe that would make the chocolate taste more powerful. However, there are lot of other cake recipes around, I might try this one next time.

Lagkage – Danish Layer Cake

lagkage-22

In Denmark you usually have a specific type of cake for your birthday, called simply ‘lagkage’ – layer cake. It is cake layers of an egg foam cake with fillings in between. The filling can be anything you like, really, usually it some combination of whipped cream, jam, fresh fruit or pastry cream.

It was recently my birthday, so of course I had to make one. I made a version with chocolate cake layers, chocolate whipped cream and apricot jam that my mom used to make. It is decorated with lots of chopped dark chocolate on top, and it is a rich and decadent chocolate cake, perfect since I love chocolate.

In Denmark you would rarely bake the cake layers themselves. They mostly just the vehicle for the fillings anyway, and you can buy vanilla or chocolate ones in almost any supermarket. Since I can’t get them here, I had to make my own, and found this very easy recipe on a Danish blog. I have been using it for years, and it really works well.The blog has some great pictures of the process, check it out even if you don’t read Danish.  The recipe makes about 4 layers, and usually you use 3 (since they come in packs of 3 when you buy). I made 1.5 portions and had 6 layers for 2 cakes.

Ingredients, cake layers (original recipe in Danish):

  • 6 eggs
  • 200 g sugar (7 oz)
  • 100 g all purpose flour (3.5 oz)
  • 40 g unsweetened cocoa powder (1.4 oz)
  • 2 tsp vanilla sugar or 1 tsp vanilla extract

Ingredients, filling:

  • 500 ml heavy whipping cream (1 pint + a little)
  • 4 tbsp unsweetened cocoa powder
  • 2 tbsp sugar
  • apricot jam, about 6 oz/ 180 g
  • 100 g dark chocolate (4 oz)
  • 1-2 tbsp rum or other liqueur (optional)

Method:

1. Use a plate to draw circles on parchment paper. I am using a lunch plate here. Draw 4 circles, or 3 bigger ones.

lagkage

lagkage-2

2. Preheat the oven to 200 C / 390 F degrees.

3. Measure out the flour, cocoa  and vanilla sugar (if using) in a bowl.

lagkage-4

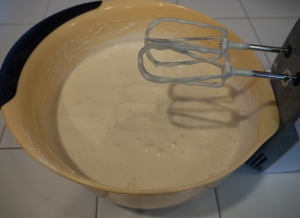
4. Put the sugar and the eggs in a big bowl, and start mixing with an electric mixer.

lagkage-3

lagkage-5

5. Keep mixing until the mixture is light, almost white, and fluffy. You should be able to create a track with the mixer. It will take about 5-8 min for a regular portion, longer if you make a bigger one.

lagkage-6

lagkage-7

6. Mix in the vanilla extract, if using that instead of the vanilla sugar.

7. Sift the cocoa, flour and vanilla sugar over the egg mass.

lagkage-8

8. Mix it very gently using a metal spoon. You want to be careful you don’t remove the air from the mixture.

lagkage-9

lagkage-10

9. Spread the batter over you circle on the parchment paper. Again be careful to leave as much air in there as possible.

lagkage-11

lagkage-12

10. Bake for about 7-15 min. They are a bit hard to see when they are done when made with cocoa. They will still be a little soft on the top when done, but should otherwise be firm. The bottoms can go dark careful, so keep hovering over your oven. The time is very dependent on you oven, I have found.

lagkage-13

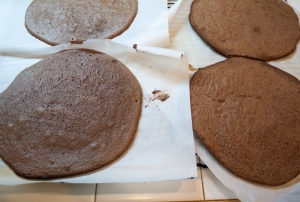
11. Remove and let cool on wire racks. Do not remove from the parchment until you are using them.

12. You can store these for a day or so in a dry place. You can stack them on top of each other with the parchment between. The top of them will stick to the parchment, that is normal.

13. Make the chocolate whipped cream by adding sugar and cocoa to the heavy cream, and then whipping it.

lagkage-14

lagkage-15

14. When you are ready to make you cake, place the first layer on your serving plate.

15. Sprinkle some rum over the cake.

lagkage-16

16. Cover the layer with jam.

lagkage-17

17. Spread chocolate whipped cream over the jam. Don’t worry if you mix some jam into the cream.

lagkage-18

18. Add another cake layer and repeat.

lagkage-19

19. Add the last cake layer and sprinkle with rum.

20. Spread whipped cream over the top (no jam) and down the sides.

lagkage-20

30. Chop the chocolate and add the chocolate pieces on top.

lagkage-21

31. Keep refrigerated until an hour before you eat it or so. It is best the same day, but after having been assembled for a few hours.

If you want to make vanilla layers, simply replace the cocoa powder with flour in equal weight, and 4 tsp vanilla. You can fill this cake with whatever you like, the apricot and chocolate is just one example. Plain whipped cream and strawberries is a great summer option, for instance.

Pumpkin Bread

pumpkin-13We had been getting a lot of different winter squash and pumpkins from our CSA recently.

pumpkin-1

I decided to use the red Kuri to make this pumpkin bread from simplyrecipes.com. I added a bit more spice to it, and that was good – I feel I could have added even more, maybe doubling the amount of cinnamon would be good. I also used brown sugar, to give a richer taste.

As most loafs, this is simple to make, but if you do use fresh pumpkin it does take a while and add some work with cutting out the flesh and pureeing. You can easily use canned pumpkin puree if you don’t have a fresh. Start at step 6 if you have puree already.

Ingredients (original recipe on simplyrecipes.com):

  • 1 1/2 cups all purpose flour (200 g)
  • 1/2 tsp salt
  • 1/2 tsp nutmeg
  • 1/2 tsp allspice
  • 1 tsp cinnamon
  • 1/2 tsp ginger (dried)
  • 1/4 tsp cloves
  • 1/4 tsp cardamom
  • 1 cup brown sugar (200 g)
  • 1 tsp baking soda
  • 1 cup pumpkin puree (240 ml) or one pumpkin
  • 1/2 cup olive oil (120 ml)
  • 2 eggs
  • 1/2 cup chopped pecans (120 ml)

Method:

1. Prick pumpkin through the skin all over and place in a baking dish

pumpkin-2

2. Bake for 1-2 hours at 375 F, until very soft

3. Cut open and scrape out the seeds.

pumpkin-3

4. Take out the flesh with a spoon, or cut off the skin. I found the latter easiest. Puree the flesh.

pumpkin-5

pumpkin-6

5. Reserve 1 cup of puree for the cake and freeze the rest, or use soon for something else. I got several cups from 1 medium sized squash.

6. Preheat oven to 350 F / 180 C and grease a loaf pan.

7. Mix together the flour, salt, baking soda, spices and sugar.

pumpkin-4

8. Mix together the pumpkin puree, oil and eggs.

pumpkin-7

9. Add the wet ingredients to the dry, but do not over mix.

pumpkin-8

10. Mix the nuts into the batter.

pumpkin-9

11. Pour into the prepared tin, and bake for 50-65 minutes.

pumpkin-10

12. Take out and cool on a rack, removing from tin after 5 minutes to cool completely.

pumpkin-11

pumpkin-12

So very yummy! I usually don’t like cakes using oil as much as ones with butter, I think they sometimes feels a little more greasy, but this worked. It was a moist and delicious loaf. I think I will add more cinnamon next time, though.

Mazarin Torte

mazarin-19

A Mazarin torte is a cake made with marzipan, or almond paste. It is a common type of torte in Denmark, where you can get cheap versions prepackaged in the supermarket (of dubious quality) to fancy little tarts at your bakery. It is a soft, moist cake with a strong marzipan flavor, topped with some sort of chocolate or chocolate frosting and usually baked in a sweet or flakey pie dough (pate brisee or pate sucre).

This recipe is baked without a pie shell, and I really don’t think this type of cake needs it, usually I think the shell ends up tasting bland and serving no purpose, the almond flavor is not a ‘strong’ flavor unlike a fruit tart that needs some balance.

I found this recipe in a fun little cookbook from Henrik Boserup, a Danish celebrity chef. The book is more inspiration than anything else, a lot of the recipes contain approximations rather than measurements or timings – and for many things that is actually all you need. For cakes like this, measurements are given though, that is nature of pastry baking. The book is simply called ‘mad‘ (food), and he made two different ones, a black and a white. They are one of my favorite cookbooks, everything is so inspiring and simple, and the format is actually quite different from a usual cookbook. This recipe is from the black ‘mad’.

This is made with orange, but other fruits can be used. I doubled the recipe to fit it in a spring form, but not the amount of orange (I only had 1 in the house), which I think was a mistake, it could have used more orange flavor.

I made a chocolate ganache to go on top, and that was great choice. That basic recipe came from On Baking.
.

Ingredients, torte:

  • 200 g almond paste (marzipan – the higher almond percentage the better) (7 oz)
  • 200 g sugar (7 oz)
  • 200 g butter at room temperature (7 oz)
  • 4 eggs
  • 2 oranges

Ingredients, ganache:

  • 160 g dark chocolate, min. 60% cocoa (5.5 oz)
  • 150 ml heavy cream ( 0.6 cups)
  • 3-6 tbsp orange liquor, such as Grand Mariner (optional)

Method:

1. Preheat oven to 180 C/ 355 F and lightly grease a 20 cm across spring form.

2.  Peel and chop the oranges, removing as much of the bitter white membranes as you can.

mazarin-1

3. Simmer the oranges in pot until almost dry and let cool.

mazarin-3

mazarin-4

4. Meanwhile, work together the marzipan, sugar and butter until smooth and homogenous.

mazarin-2

mazarin-5

5. Add in the eggs.

mazarin-6

6. Add the flour (and a pinch of salt if using unsalted butter) and mix lightly. The consistency should be like a thick cream.

mazarin-7

7. Add the orange.

mazarin-8

8. Pour your batter into the prepared tin.

mazarin-9

9. Bake for 40-60 min. The cake should be golden brown, springy to touch and set all the way through when a toothpick is inserted.

mazarin-10

10. Let cool on a rack.

11. Make your ganache while the cake is cooling. Chop the chocolate very finely and heat the cream gently, until just boiling.

mazarin-11

12. Pour the hot cream over the chocolate and mix  with a rubber spatula until smooth.

mazarin-12

mazarin-13

13. Add the liquor and mix some more. Let cool slightly.

mazarin-14

14. Spread the ganache over the cake and down the sides. Make pretty swirls for decoration if desired.

mazarin-15

mazarin-16

mazarin-17

mazarin-18

This turned out really, really well, except it could have more orange flavor. I really don’t think this cake need a shell, it worked out very well.

Cinnamon Buns

cinnamon-20Is there anything better than warm cinnamon buns with lots of sticky filling on a cold fall day? I am not a huge fan of cinnamon, but I do get a craving for these. They are very rich and wonderful just out of the oven.

I got the recipe from a friend who brought them to work one day, the recipe is from a cookbook somewhere, but I don’t have the source. The original recipe uses a standing mixer to make the dough, I just hand knead it and it works fine.

Ingredients, buns:

  • 4 1/2 – 5 cups all purpose flour (705-780 g)
  • 4 tsp active dry yeast ( about 40g fresh yeast cake)
  • 1/3 cups sugar (90g)
  • 1 1/2 tsp salt
  • 1 cup milk, lukewarm (250 ml)
  • 6 tbsp. unsalted butter in cubes at room temperature (90 g)
  • 3 eggs
  • 1 1/2 tbsp milk for brushing

Ingredients, filling:

  • 1 cup light brown sugar (220 g)
  • 1/3 cup all purpose flour (60 g)
  • 3 tbsp sugar
  • 1 tbsp  (generous) cinnamon
  • 1/2 cup cold unsalted butter in cubes (113 g)
  • Method:

1. Dissolve the yeast in the lukewarm milk

cinnamon-2

2. Add 2 cups of the flour, sugar and salt and mix.

cinnamon-3

3. Add the eggs and butter and mix in

cinnamon-4

4. Mix in the rest of the flour and turn out on a work surface. Knead well, until smooth and elastic.

cinnamon-5

cinnamon-7

5. Put the dough back in your bowl, cover with plastic film and let rest 1.5-2 hours, until doubled.

cinnamon-8

cinnamon-12

6. Meanwhile, make the filling. Mix together the flour, sugars and cinnamon.

cinnamon-9

7. Cut in the butter until you have mixture that resembles crumbs. I find it easiest to use my fingers to ‘squeeze’  in the butter with my fingers.

cinnamon-10

cinnamon-11

8. Store the filling in the refrigerator until needed.

9. When the dough has risen, roll it out to a 14×10 inch (35×25 cm) rectangle.

cinnamon-13

cinnamon-14

10. Sprinkle the dough with the filling, covering it evenly.

cinnamon-15

11. Roll up the dough from the long side. Pinch it closed on the long side.

cinnamon-16

12. Cut the roll into 10 pieces, about 1.5 inch (4 cm) thick each.

cinnamon-17

13. Place the rolls on a parchment lined sheet, or in a lined and greased 9×13 inch pan.

cinnamon-18

14. Cover with film and let rise for 1 hour.

15. Preheat oven to 375 F/ 190 C.

16. Brush the rolls with milk

17. Bake the rolls in the oven until golden brown, about 25-30 min.

cinnamon-19

18. Let cool a little on the sheet, the gently remove them with help of a spatula. Leave them all joined together and let cool on a rack

19. Pull apart to serve. You can serve them still warm, cold or gently re heated.

These are so decadent, I don’t feel they need any icing, but you could add some if you wanted tom of course. They are rather big, so you could also make 2 smaller squares and twice the rolls with a little shorter baking time.

‘English’ Tea Cake

teacake-9

I love spice cakes, and my mom send me this recipe along when I asked her, I recall her making this from time to time during my childhood. It is an old recipe, my mom send me a scan of an old recipe card, I think it is from the 70s. It is part of a series of recipe that Danish flour company Amo distributed in stores at the time. They have also published all the old ones on their website, but it is of course more fun to use the one with my mom’s handwritten notes.

opskrift

I love the blend of spices of this, and all the raisins. Simple and delicious. I doubt it is actually English as such, but that is what they named it.

Ingredients:

  • 500 g all purpose flour (17.6 oz)
  • 250 g butter (softened) (8.8 oz)
  • 250 g sugar (8.8 oz)
  • 2 eggs
  • 250 ml milk (1 cup)
  • 250 g raisins (8.8 oz)
  • 1 tbsp ground cardamom
  • 1 tbsp gound cinnamon
  • 1 tsp ground cloves
  • 1 tsp baking powder


  • Method:

1. Grease 2 loaf tins and preheat the oven to 175 C / 350 F.

2. Use an electric mixer to mix sugar and butter until it is soft and fluffy.

teacake-1

teacake-2

3. Add the eggs one at a time, mixing well after each

4. Add all the dry ingredients (flour, spices, baking powder) and mix, then mix in the raisins.

teacake-3

teacake-4
teacake-5

5. Pour the batter into the prepared tins

teacake-6

6. Bake for about 1 hour, or until the top is well browned and a toothpick inserted comes out clean.

teacake-7

7. Let cool a bit on a wire rack, then take them out of the tins to cool completely.

Enjoy with tea (or coffee)! You can see that I have half a cake with no raisins, my husband is not too fond of raisins in baked goods, so I make a bit for him without. However, since this cake is not really that sweet or moist without the raisins I can’t really recommend omitting the raisins.

If it gets a little dry after a few days, it is great toasted with butter.

Zucchini Muffins

final-1Part 2 of our zucchini eating quest, these muffins are quick and delicious too. I modified this recipe on simplyrecipes.com. I ended up cutting it in half, as my muffin tins are very small and the portion looked big – it worked out perfectly for 12 small muffins. I switched to brown sugar and kept the spice amount for the large portion, as I love spicy cakes and I decided to add some candied ginger, which worked very well with the taste of the muffins. I had some homemade in the freezer I had made at Christmas – it kept very well frozen!

Ingredients:

  • 1 1/2 cups raw, grated zucchini (350 ml)
  • 1/3 cups melted butter (75 g)
  • 1 egg
  • 1/2 cup brown sugar (115 ml)
  • 1 tsp vanilla
  • 1 tsp baking soda
  • pinch of salt
  • 1 1/2 cups all purpose flour (350 ml)
  • 2 tsp cinnamon
  • 1/2 tsp nutmeg
  • 2 tbsp finely chopped candied ginger
  • 1/2 cup chopped walnuts (115 ml)
  • 1/2 cup golden raisins (115 ml)

Method:

1. Grease a 12 muffin tin and preheat oven to 350 F/ 175 C.

2. Mix together sugar, eggs and vanilla.

squah muffins-1

3. Mix in the grated zucchini and butter.

squah muffins-2

squah muffins-3

4. Mix in the dry ingredients.

squah muffins-4

5. Stir in the nuts, ginger and raisins.

squah muffins-5

6. Spoon the batter into the prepared tins.

squah muffins-6

7. Bake for 25-30 min.

squah muffins-7

8. Let cool slightly in the tins, then take the muffins out to cool completely on a rack.

squah muffins-8

Enjoy!

Zucchini Cake

squah kage-10
We are members of a CSA (Community Supported Agriculture), where we get organic veggies all summer long. We love it, the fresh veggies taste delicious and when we go to the farm to pick them up, they have a kids garden where our toddler picks carrots and green beans and more. It think it is great for kids to see where the food comes from.
As anyone who have grown them knows, zucchini plants can end up producing a lot, and so it is with our CSA – we get more zucchini than we know what to do with.

One of the things I did make was this great zucchini cake, which is a recipe I got from my mom. The original is a clipping from a Danish magazine, I don’t know when or what. It is simple to make, and delicious getting great flavor from cinnamon and hazelnuts.

So simple, this was my view down while making this!

So simple, this was my view down while making this!

Ingredients:

  • 3 eggs
  • 200 g brown sugar (preferably dark brown) (7 oz)
  • 150 ml canola oil (or other neutral tasting vegetable oil) (0.6 cups)
  • 300 ml raw, grated zucchinis, about 2 medium. (1 1/4 cups)
  • 225 g all purpose flour ( 8 oz)
  • 1 tbsp cinnamon
  • 3/4 tsp fine salt
  • 2 tsp baking powder
  • 75-85 g coarsely chopped hazelnuts, toasted or raw (2.5-3 oz)

Method:

squah kage-1

1. Grease a 20-25 cm/ 8-10 inches spring form tin and preheat oven to 150 C / 300 F.

2. Use a mixer to mix the eggs and brown sugar until slightly foamy.

squah kage-2

squah kage-3

3. Add the oil little by little.

squah kage-4

4. Add the grated zucchinis, the flour, cinnamon, salt and baking powder and mix well.

squah kage-5

5. Add the nuts. I used toasted nuts for this, as my local Indian grocer sells big bags of these (much better than the tiny bags I can get in Safeway), but raw nuts works equally well.

squah kage-6

6. Pour in your prepared tin, and bake for about 1 hour and 10 minutes. The cake should be golden and firm to touch, and an inserted toothpick should come out clean.

squah kage-7

7. Let the cake cool a bit on a rack, then remove the tin ring and let cool completely.

squah kage-9

Easy and delicious! Note that due to the high moisture from the zucchini, I find that this cake doesn’t keep as well as most other cakes I bake (which are usually fine for a week), eat within a couple of days.